
Which
One of These Is Not Like the Others?
(or
Using Checksums to Deduplicate Image Collections)
As your image collection grows you will find that your responsibilities
expand to include not only things like the prevention of data loss, but elimination
of waste and inefficiencies..and one of the biggest wastes of time and money
are those caused by redundant files.
If you have duplicates in your collection, you incur inefficiencies in storage
and backup (and the associated costs); but more importantly, these inefficiencies
in your management of those files create a huge drain on your time. After
all, if you do happen to run across a file with multiple copies, it's difficult
to know which one you may have "touched" (worked on) most recently without additional
investigation.
Those of you that have tightly controlled processes for adding
files may find the following interesting, but not particularly useful. For
the rest of us, if we took the time to review the files in our collection
we would
likely find a fair number of duplicates.For those who manage
files for others in an office or workgroup, there are probably more duplicates
than they even realize (or want to think about). The question is how to find
these redundant files without it becoming an overly burdensome "finding
a needle in a haystack" task.
Using Checksums
for Data Deduplication
The method outlined in this article shows you
how to evaluate checksums or hashes to "deduplicate" your collection.
Data Deduplication involves scouring your hard drive / server, etc. for
redundant instances of files and selectively deleting them. While the
text which follows makes reference to image files, the same process can
be used for any file type on a computer. If you are managing
a large number of image files that should not be modified (like proprietary
Raw files), then you will definitely find the following information beneficial.
As image files take up substantial space, being able to eliminate all
but a single instance could significantly decrease your need for storage,
especially if you
haven't always had a strict file handling process when first adding files. If
you have had a hard drive crash, it's quite common to end up with multiples of
files when you reload all of the information, especially if a lot of that was
on CDR or other removeable media. While hard drive storage is becoming cheaper
all the time, if you envision moving all or part of your image collection to
the "cloud" or other remote storage, it really doesn't make much sense to have
multiple copies of the same image asset within the same collection.
Overview
You will need to have a utility installed which
is capable of creating a Checksum file, such as those discussed in the
"Trouble Transporting Tribbles: or File
Verification using MD5 Checksums" article,
a spreadsheet application like Microsoft Excel, and some time. The goal
is to gather all checksums together for the image collection
we want to deduplicate, sort them by their checksum values, and then
use a spreadsheet calculation formula to help us quickly identify the
duplicates -- if any exist. If there are duplicates, then we can
use the spreadsheet as our checklist for deleting the files.
In short we need to:
It will, however, allow you to find images that are the same
even if the file modification date has changed, or the filename is different.
It's not uncommon
to have images that have been downloaded from a website be stamped with
the date they
were download as the file creation or modification date.
In corporate workgroups it's very common to find the same file renamed
by someone else using a file name that makes sense to them. Multiply by
the number of users
and you could easily have 4 or 5 versions of some popular files.
The great news about only finding exact duplicates is that once you have found
a match (and verified them), your only decision is which file to keep; and
even that decision may not be that difficult as often the choice to delete
or retain
will be based on where the file is located. As the
two files are true "duplicates" you don't have to worry much about whether
one image is newer, or has had it's metadata worked on, as this process will
only flag them as duplicates if they are bit-for-bit the same, including metadata.
However, rather than indiscriminately deleting files you might want to first
look to see if there is any pattern to the duplicate files that you find. You
may find that a particular folder full of files was copied with a different
folder or file names.
If you are trying to locate images that visually match each other, but are
not identical duplicates, there are other methods you might want to pursue
(these
will be addressed in a future article).
Creating the Master Checksum File
If you have not created checksum files for your folders or
drives that has to be done first. If you are not familiar with that process,
see the
previous article, "The Trouble Transporting
Tribbles: or File Verification using MD5 Checksums."
At end of this article, I will share some sample data of my own to give
you
a rough idea of how much time this process might take. Once you have gathered
together
the text file(s) with those checksums and the file paths, then you can
add
the calculation formula to find the duplicates. Note, while the examples
below use
MD5 checksum values, the process will be the same if you are using other
types of checksums such as SHA-1, or SHA-2. The only requirement is that
all hash
values be of the same type. In other words if you put both MD5 and SHA-1
checksum values
into a spreadsheet to evaluate, the process can't locate duplicates.
What's in a Checksum file?
Checksum+ and MD5summer both use a plain text
file containing one line for each file and its corresponding checksum in
the format:
CHECKSUM<whitespaces>FILENAME. The delimiter between the filename
and checksum is always several blank spaces; tabs don't seem to be used.
So, you'll
have to
either manually search and replace these whitespaces or make the necessary
adjustments when importing the data into a spreadsheet for sorting. MD5Summer
has a couple
of additional lines/rows before the data, whereas Checksum+ just starts
with the data.
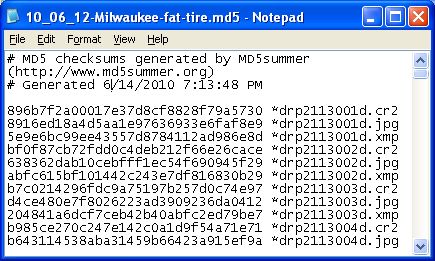
Here is what an MD5 checksum file from MD5summer looks like for a single folder
with no subfolders when opened in notepad.
Here is what an MD5 checksum file from Checksum+ looks like for a single
folder with no subfolders when opened in a the Apple Textedit program.

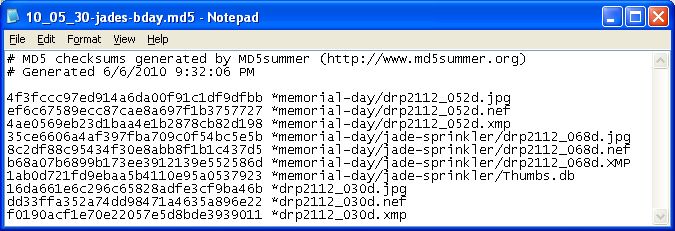
Here is what an MD5 checksum file from MD5Summer looks
like when the "Add Recursively" option is used to capture a folder with
subfolders:
Here is what an MD5 checksum file from Checksum+ looks like for a folder with
subfolders:

"Mash" Your Checksum Files
In order to compare the checksum values, you will eventually
need to have all this information in a single file, and/or imported into
a spreadsheet.
If
you ran a checksum operation on an entire drive or volume, then you may
only need to import that single file. This makes for an easy import,
but the creation of that checksum file might take a while.
If you already have a number of checksum files from various
folders, you might find it takes less time to import each in turn and create
a master checksum text spreadsheet (in other words create a "mashup" of
all the separate files). If that is your plan, you'll probably find it
easier to
move
a copy of each of those checksum text files to a single folder, as the Get
External Data option (in Excel) will return to the same folder each
time. Another option, is to first open each of the separate checksum files
in a simple
text editor and combine them all into a single one before importing.
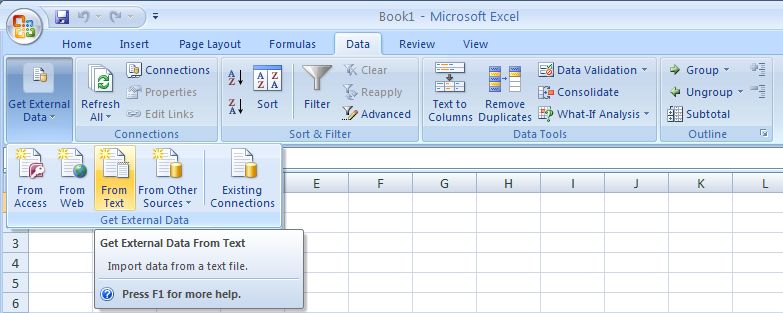
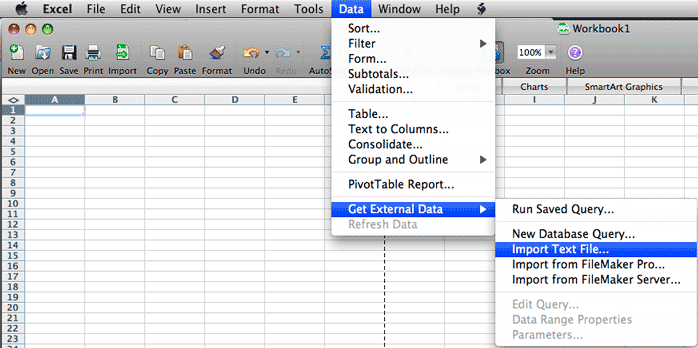
The Windows version of Excel 2007, which uses the "ribbon
bar" is shown above. Below is the older style version of Excel for Mac
OS X.
As there are a number of blank spaces between the checksum
values and the filename or path/filename, using the Data Import option
within your spreadsheet program, may be the simplest -- if this is provided
as an option. For example in Excel, you can look under the Data tab or
menu item and then find the Get External Data >> Import Text File
menu item. Then locate the Checksum file where it was saved. Note,
if you are using MD5summer the checksum file that is created will have
the ".md5" extension; so you will need to change the "Files of Type" pull-down
to "All Files (*.*)" in order to "see" the file in the folder. The Checksum+
files use a standard .txt file format, so they should show up when you
access the folder where they are stored.

When you import the file, there are a couple of different
options in the import "Wizard." You
can use the "Delimited" option, and then click "Next" and then check the box
labeled "space" to tell Excel to use blank spaces as the marker between the two
values. The other "Fixed Width" option can also be used to separate the
first set of characters (the hash) from the file/path name.

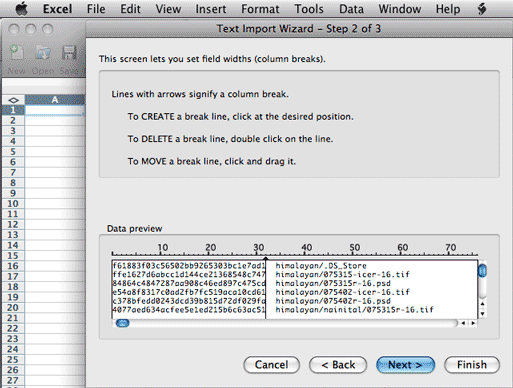
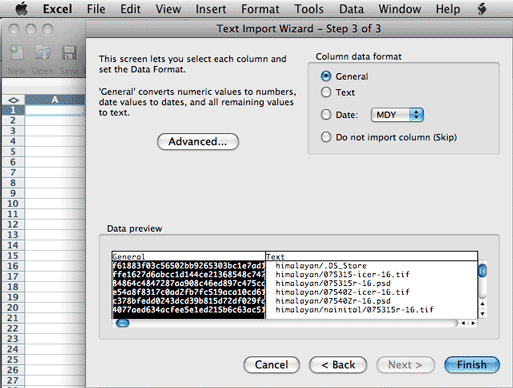
Expert Tip: if you are working with a collection of
files where the users (or you) have blank spaces in the file or folder
names you will definitely
want to use the "Fixed Width" option. The "Delimited" option will interpret
each blank space in a file or folder name as a delimiter, and you'll end
up with many more than two columns of data. Also note that if you are using
a file naming structure that has leading zeros, you'll want to change the
cell format from "General" to "Text" as otherwise a file like 09122501.nef
could have the leading zero dropped and become "9122501.nef."
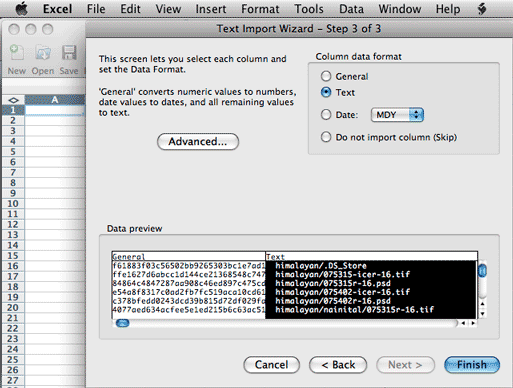
In any event, you'll need to get all of the checksums representing all
of the folders you want to check in a single spreadsheet before running
the formula
to locate the duplicates.
Include "Path" references
If you are joining together multiple checksum files you might
want to include
the "path" to each file as well, to make it easier to locate
files later -- especially if your checksum files only have the file name.
Why that is important should be obvious, if it isn't it will be when you
get to the
deletion phase.

If you are importing checksum files that each represent
a single folder, then adding the path to that folder in the column to the
right of the file
name
for that set of imported entries will make it possible to know where that
particular file is located (plus it's a lot easier than trying to find
a way to insert
it
into the column where the file name is located. If you are wanting to
compare files on various drives or storage volumes, then you probably will also want
to include those portions of the path names as well. Whether you wish to
make these full, syntactically correct paths is up to you. The key is that
you are
trying to make it easy to locate the files that are flagged as duplicates
so they can be deleted.
Clean Up Your Sheet
While not required, you may want to remove the
detritus from the imported checksum files (such as the first three lines
from each MD5summer file)
and maybe even
label the column headers, especially if you keep the file for reference.
Identifying Duplicate Files in the Spreadsheet
After you have all of your checksum files in the spreadsheet,
you can sort by the checksums in column "A." In Excel, first select all the columns with
data, and locate the Sort & Filter button (under the "Home" tab in the ribbon
bar) and then choosing "Sort A to Z." Any checksum hashes that match will
now be located next to each other.

Of course, visually scanning Column A for duplicate entries is mind-numbingly
boring and unless you possess extreme proofreading skills, or have some
OCD tendencies it's unlikely you will find them all. However, this is just
the kind of job that
computers (and spreadsheets) can handle easily no matter how many rows
of data.
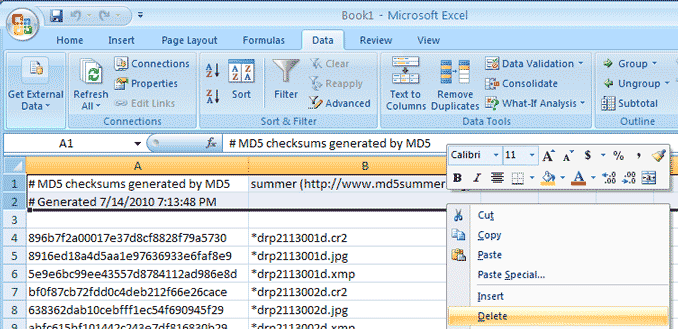
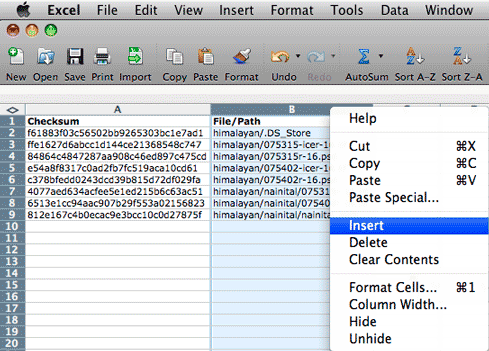
After you have sorted the data by the value in the Checksum
column, insert a new column between A & B. You can call it "Dupe?" if you
like. Simply click on the B at the top of column B and then Right-click (Windows)
or Control + Click (Mac) and choose "Insert" from the contact sensitive
menu. A new blank column should now appear between the checksum values
and the file/path.
You can also locate the Insert Column command under the Home tab in the
ribbon bar of newer versions of Excel.
If you used the import wizard to set the cell formatting property to "Text" earlier,
be sure to first change the property for this new blank column to "General" or
another type that allows for formulas.
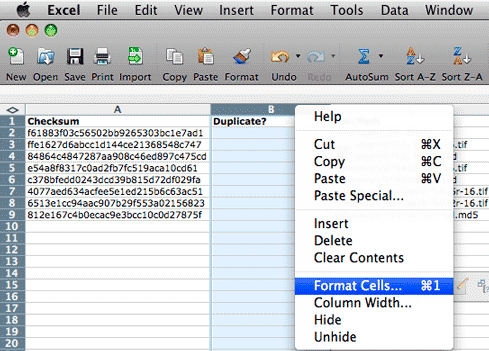
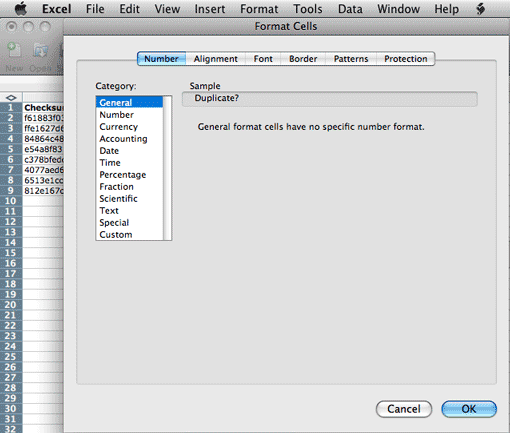
Click on the B at the top of column B again, and then Right-click
(Windows) or Control + Click (Mac) and choose "Format Cells" from
the contact sensitive menu. In the resulting dialog click on the Number
tab and set the value under Category to "General."
In the second row of column b (B2), you will need to insert the following
formula:
=IF(COUNTIF($A$2:$A$999,A2)>1,"dupe","")

In laymans terms, what this formula does is to have Excel note the value
of the current data cell (indicated as $A$2), and then check to see if
that same
value
is in a given range (in this formula 999) of data cells below it. If a
match is found, the formula returns a value of TRUE (rather than FALSE).
The IF statement at the beginning of the formula says
that if a TRUE value is found to print "dupe" into
column B beside it (if the result is FALSE it
will not print anything). This process keeps repeating up to the
cell value noted after the colon (indicated as $A$999 above).
If you have more than 999 rows, then you will need to adjust the second
instance of $A so that it notes the last row in your spreadsheet (otherwise
be sure
to press the Enter/Return key after adjusting the formula). So if you
have 3525 rows, the formula would need to read:
=IF(COUNTIF($A$2:$A$3525,A2)>1,"dupe","")
After making the necessary adjustment for the number of rows, you then
need to copy this formula into the rest of the cells. Now if you are thinking
that this
means a lot of copying and pasting, relax and take a deep breath. This
will only take a handful of keystrokes.
First click on the cell where the formula is located (in our example this
is B2). Then either use the shortcut keys to "Copy" the value of
this cell, or use the Copy command under the Edit menu.
Now use your cursor to click into cell B3. Then use the scroll bar to move
to the last row in your spreadsheet. While holding the Shift key down,
click into
the last cell (this will highlight all of the cells between B3 and BXXX).
Now use the shortcut "Paste" keys, or locate "Paste" under the Edit menu to replicate
the forumula into the rest of the cells. If you click into B4, you will see that
the formula is very similar, but not the same. The value just before
the close parentheses will increment to match the row of the cell.
So in row 2 the formula reads: =IF(COUNTIF($A$2:$A$3525,A2)>1,"dupe","")
and in row 9 the formula reads: =IF(COUNTIF($A$2:$A$3525,A9)>1,"dupe","")
You can now quickly scan Column B of your spreadsheet and see if you have
any exact duplicates, which will now have the term "dupe" next to them.
Before moving to delete these files, here are a few known file issues that
might trip
you up.
Known Issues that Might Trip You Up
There are some files that are likely to show up as duplicates, even
though they really are not. These are more likely to appear when moving
files
from one computer
operating system to another. They are noted here for your convenience,
along with a little explanation of their purpose. There isn't any good
reason to retain
these in your spreadsheet. Whether or not you wish to remove the actual
files from your hard drive is something you may want to test before deciding.
Double Format files
On most Macs, a "double format" is used in the file system and
moving a file to a different file system will cause the prefix "._" to
appear for each file name (a period and underscore
followed by the file name). If,
for example, you are creating checksums on the Windows platform for images
created or moved from a Mac platform, there will be a "._drp2105047d.jpg" in the list
along with "drp2105047d.jpg" when you view the report (unless you have deleted
the "doubles" prior to creating the checksum). Due to these "doubles" being
file system proxies, the underlying data is the same in all, and thus the
checksums will all have exactly the same value (even though the larger
files they reference
are not duplicates). As these files are mated to the originals, it is safe
to
ignore them when locating duplicates. If the files are now residing on
a storage device that will only be accessed on Windows, you could remove
them without
causing any harm.
Desktop Services Store Files
On Macs the ".DS_Store" (aka the Desktop Services Store) is a hidden file
created by Apple Inc.'s Mac OS X operating system to store custom attributes
of a folder
such as the position of icons or the choice of a background image. This
file is created by the Mac OS Finder and is used to keep track of icon
types and positions, folder view options, and other
information about that folder. There is also a separate .DS_Store
file that is created for each directory to store information about that
directory.
As a result you'll find them appearing all over your hard drive, in virtually
every folder that you have visited with the OS X Finder.
Thumbs.db
This Windows system file is a cache of the thumbnail pictures in that directory.
It speeds up the showing of thumbnails when you are viewing a folder in
Thumbnail view. These files should not affect performance, with the exception
that they
take up disk space. Although this space is very small in most cases, if
you have a lot of thumbs.db files scattered across your hard drive you
may be able to
save some space by removing them.
If you want to prevent the creation of this cache file and delete
all the thumbs.db files that are on your hard drive, follow
the steps below:
Verify Before Deletion
Now that you have run your deduplication formula you should
be seeing the word "dupe" appear next to each entry where the checksum appears twice (or more).
Even though the checksum hashes happen to match for two or more files, it's still
a good idea to visually verify that the images are the same before deleting. You
may want to open them in an image editor, or locate them within your
image catalog, or look at the thumbnail in the Finder or Explorer window.
If you read the previous post, "File Verification using MD5 Checksums" that covered
how to create Checksums, you might recall that "Each check/sum hash should be
unique (unlikely to match other hashes for similar images)." This doesn't
necessarily rule out that while "unlikely" it's not "impossible" that
there could be two different files with the same checksum that are not
duplicates.
Having the drive location and path will make it a bit easier to locate
the files for visual inspection and deletion.
Flag Deletions with a Color of Your Choice
I typically apply a color
shade to the matches as I delete that file. If you have
a very long spreadsheet, you might also want to add a column and simply
add a number 1 to that cell. This will allow you to do a sort at
the end, and move all of the matched duplicates to the top of the sheet.
If these are images that are already in your image cataloging software,
it may simply require typing in both file names as part of a search. If
you are using an image cataloging program then you may wish to use the "delete" features
within that application, as then you won't wonder later why you have
a thumbnail for a file that no longer exists. If you aren't already using
an image database
you might want to consider one of those mentioned on the Image
Database and Cataloging Software
page.
Some Real World
Results
Here are some real-world results
from one test using the free MD5summer checksum utility.
MD5summer took 41 mins, 55 secs to scan and create MD5 checksums for 771
files located on fileserver connected via ethernet. This image collection
(a set of folders within a folder) occupied 15.9 gb on disk.
I used the formula described above on the spreadsheet I created from the
MD5 checksum report and found 55 instances of duplicate files. After visually
confirming
that
these were the same files, I manually removed the files. I was able to
reduce this
portion of my server to 714 files which took up 15.3 gb on disc (I
didn't delete all files in one sitting, so I can't tell you how long
the deletion portion took).
For other related articles, check the What's
New page, or stay tuned to posts on Twitter,
or the ControlledVocabulary Forum] if you
are interested.
Many thanks to Dan Dill, Dave Klee, Alberto Mateo, Said Nuseibeh
and Tony Schutz for their assistance in proofing and testing the suggestions
in this article.
Initially posted: August 3, 2010


